If you want to have pre installtion check,Health checkup, recommendations and collect logs for support. Then please go through the document so that you can learn how to run a Sym help tool
↧
A graphical overview of using Sym Help tool
↧
About the new SymHelp tool for SEP 12.1RU2
I. The Tool
Symhelp is a new version of the troubleshooting tool that replaces the legacy Symantec Support Tool.

You will find the tool on the SEP 12.1 RU2 Installation CD – the included here version is 2.1.1.74. The latest available version from Symantec at the time of this article release is 2.1.7.95. The revisions of the Symhelp tool are updated quite often (even several times a month) - if possible use the latest available from Symantec. You can download the tool either going to the following link: http://www.symantec.com/docs/TECH170752 or from the SEP Client GUI - by going into Help -> Download Support tool -> this redirects directly to the Symantec Article mentioned in the reference.
The tool is used to troubleshoot SEP Clients and SEPM Server but not only – it supports as well following Symantec programs:

Note: You can you Symhelp on SEP 12.1 RU2 installation and as well all previous versions. The old Symantec Support Tool is compatible only with all SEP 11.x version and the 12.1 versions prior to RU2 – if you try to run it on SEP 12.1 RU2 installation it will fail with the following error:

If your machine has connection to the internet every time you run the tool it will check for an update from Symantec – if such is available it will be downloaded automatically and will replace the SymHelp.exe executable. The tool will require as well the .NET installed already on the machine – for Windows 8 or Windows Server 2012 the version of .NET 3 or higher will be required. If .NET is not installed tool will prompt for this installation.
II. The Options
After accepting the EULA you will see the Home page of the SymHelp tool. From here we can select the type of Symantec Products we want the report run for and the type of the scan as well.

Main SymHelp GUI provides us with additional Support Resources:
- Search Knowledge Base - here we have a general selection for all product that will takes us to the product selection page (http://www.symantec.com/business/support/index?page=products) or we can specify a certain product at this stage.
- Browse Forums - here as well we can opt for all products that will takes us to home page of Symantec connect (https://www-secure.symantec.com/connect), or we can choose a specific product forum
- Open a Case Online - this selection takes us to the logon page of the MySymantec portal:
https://my.symantec.com/webapp/faces/login?appParam=support
- Contact Technical support - opens http://www.symantec.com/support/techsupp_contact_phone.jsp
- Contact Customer care - http://www.symantec.com/support/assistance_care.jsp
Additionally for reference there is a System Usage section that gives us information about current Memory and CPU utilisation as well as shows how much disk space is free on either local or networked drives.
Before running the tool we need to select product scan type, this can be one or more of the following:
- Health check - scan of installed products, will try to identify known issues
- Best practices - scan of the configuration in scope of the compliance with the best practices guidelines
- Pre-install check - scan of system readiness for product installations including the check of system requirements
- Full data collection for support
There are 2 more independent selections available under the"Run Threat Analysis Tools" section - this refers to tools used for identifying suspicious files and threats:
- Symantec Power Eraser
The tool is aimed at the detection and clean-up of "zero-day" threats as well as other threats which may have infected the user’s system.

SEP Power Eraser GUI gives us following options:
- Scan for Risks - additionally available for selection is "Include a Rootkit Scan" - this will require a reboot
- History - where we can check results of previous Power Eraser sessions, you can as well recover from here files that were previously detected
- Settings - enables to selected "Include a Rootkit Scan" option and set up a network configuration.
Reference:
http://www.symantec.com/theme.jsp?themeid=spe-user-guide
- Symantec Load Point Analysis
Load Point Analysis examines files that launch from known and specific locations on the drive and in the registry (according to the OS) in order to find out which files are likely to be not a genuine executable and possibly may pose a threat to the system. Those are then checked within the online Symantec Reputation database and given a score that may classify them as unknown files or a potential threat.

SymHelp gives us here some options for scan setting:
- Scan Load Points, Running processes and Common Directories -> this is selected by default
- Scan Program File Directories
- Scan additional files and directories

We can select this additional locations from Symantec Load Point Analysis -> Settings -> Options menu. Here we will find as well several options for Network configuration either through Automatic configuration from IE or configuration script or specified proxy server.
After the Load Point scan is finished we will be presented with final report on following:
- Amount of files the analysis was performed on
- Amount of files verified as good using their digital signature
- Amount of files verified as good using the Symantec Reputation Database
- Amount of files verified as bad using Symantec Reputation database
- Amount of files that needed additional check

* The report will show the amount of files that should be manualy verified by sending them to Symantec Security response -> here we have as well an option to copy these files to a local folder
* The files tab will as well contain the listing of files for manual verification. The Processes tab shows all running processes alongside with their reputation score and path to the file.
* Load Point Analysis will by default check for any existing autorun.inf files on the local or networked drives.
Reference:
http://www.symantec.com/docs/TECH141402
http://www.symantec.com/docs/TECH96291
--- Few notes and considerations to the SymHelp selection types:
* Health check and Best Practice scans can be only chosen for already installed products. If you have chosen a Symantec Product not yet installed these 2 options will be greyed-out from selection
* Pre-install check will scan the system only checking for the installation requirements in scope of SEP 12.1 Client for Local and Remote installation. The results of the scan will be then displayed in the reports section of:
- System meets the requirements for SEP 12.1: Local install
- System meets the requirements for SEP 12.1: Remote install
* If asked for Symhelp tool report by Symantec Support please run the report with option "Full data collection for support" - this will include all necessary information alongside with SEP/SEPM logs needed for investigation/troubleshooting. Providing Symantec support with only Health Check or best practices scan will give only a initial insight in the configuration but may prove not enough for the scope of troubleshooting purposes.
* When collecting the Load Point Analysis data for support, remember to check the option "Collect SEP data for Symantec Support Case" as well.
--- Saving the report:
After all the scans are completed we can save the report from the "Save" tab. There is currently no possibility to change the name of the report file - by default it will by computername_date_time.sdbz. We can however take a target directory for saving of our choosing. There is as well an option "Save and send to Symantec Support" - please note that using this option do not automatically open any case with Symantec Support. When saving the report this way please always inform the support team that the report has been sent using this option.

III. Additional switches / SymHelp from command prompt
SymHelp tool execution is possible as well directly from command prompt. There are as well several switches available for additional debugging and user visibility. These are the available symhelp.exe switches:

* SymHelp with advanced debugging:
Starting the Symhelp tool from command line with the -wizprod switch will give us some more options for setting up advanced debugging and issue reproduction during the report is being collected.
We can enable the default debug level by simply selecting Debug - Enabled - this can be executed by the command line switch as well. By choosing the Advanced Debug option from the selection tool will present a new windows with additional selection available - this will include:

- SNAC debugging
- SEP Debug
- SEP sylink debugging
- WPP logging
...after clicking "Next" the tool will inform that the debug has been enabled (in registry) and we can reproduce the issue - after that click "Next" for the debug to be turned off and report to be collected.

[Note]: the –deepdata switch used previously in the Symantec Support Tool for gathering of the advanced WPP debugging is no longer existing in the SymHelp. WPP Debug can be collected by going into symhelp.exe –wizprod and enabling that kind of debugging from the GUI.
IV. The Report
Depending on the selected scans it will take a couple or more minutes to generate the report. (Please note that for the purpose of this article I will focus mainly on the information gathered when troubleshooting SEP and SEPM installation without including several other products that can be scanned with SymHelp). After report is completed we will be given following tabs for preview:
1. Home - general information about the Scan Status and selected product information - the screen shown will be here a bit different depending on if we open the tab directly after scan was finished or if we open a previously saved report from drive. When opening a previously saved report - the option for new scan run will not be available at this point anymore - restart of the tool will be necessary to scan again.
2. Report - this section is split on 5 different tabs as follows:
- Error - "This tab displays reports that resulted in an error status. An error status indicates that an issue has been detected and requires further examination and/or action."
- Warning - "This tab displays reports that resulted in a warning status. A warning status indicates that a possible issue exists. Further action may or may not be required depending on factors that the report cannot determine."
- Missing data - "This tab displays reports that could not examine all the data needed in order to yield a report status. If one test failed to access required data this will determine the status of the report as Missing data."
- Ok - "This tab displays reports that resulted in a status of Ok. An Ok status indicates that the issue being tested for was not found and no action is required."
- All - "This tab displays all the reports for a given product regardless of status. If a specific report is known and its results sought after, it may be quicker to find the report under this tab rather than to look under each of the status specific tabs."
We can adjust the selection of product on the left side of the GUI in case several product were chosen to generate the SymHelp report and we want to see only the results applying to one specified product at this point.
The reports will contain both text and hyperlinks to Symantec KB Articles if such are available for the encountered problems. You will find more details to each report by expanding the details section.
Some of the examples for most common reports that we can find in the reports section:
- SEP Client examples:

- Symantec Endpoint Protection drivers and services need attention

Reference for solution:
Are the Symantec Endpoint Protection drivers loaded and services running?
http://www.symantec.com/docs/TECH92415
- Security advisories for Symantec Endpoint Protection Client

- The latest version of Symantec Endpoint Protection Client is installed – in case of not the latest version installed the links provided will include the newer revisions than the one installed.


Reference for solution:
Obtaining the latest version of Symantec Endpoint Protection or Symantec Network Access Control
http://www.symantec.com/docs/TECH103088
Release Notes for Symantec Endpoint Protection, Symantec Endpoint Protection Small Business Edition, Symantec Network Access Control 12.1
http://www.symantec.com/docs/DOC4332
- Client to Manager communications are [not] working

Reference for solution:
Symantec Endpoint Protection: Troubleshooting Client/Server Connectivity
http://www.symantec.com/docs/TECH105894
- Windows Firewall Configuration

Reference for solution:
Symantec Endpoint Protection clients do not communicate properly with the Symantec Endpoint Protection Manager
http://www.symantec.com/docs/TECH102803
- Definitions corruption checks – report about the currently used revision, check performed for corrupted definition files and missing definition files.

- SEP 12.1 Virus Definitions are not corrupt
- SEP 12.1 BASH Definitions are not corrupt
- SEP 12.1 Submission Control Data Definitions are not corrupt
- SEP 12.1 IPS Definitions are not corrupt
- SEP 12.1 Iron Revocation Definitions are not corrupt
- SEP 12.1 Iron Settings Definitions are not corrupt
- SEP 12.1 Iron White List Definitions are not corrupt
- SEP 12.1.2000+ Extended File Attributes Verify Trust Definitions are not corrupt
- SEP 12.1.2000+ SRT SP Settings Definitions are not corrupt
Reference for solution:
Potential Symantec Endpoint Protection content definition corruption
http://www.symantec.com/docs/TECH92043
- System meets the requirements for Symantec Endpoint Protection 12.1: Local install

Reference for the included links from the detailed view:
Does the computer need to be restarted?
http://www.symantec.com/docs/TECH92413
Does the current user have local administrator rights?
http://www.symantec.com/docs/TECH91646
Is the Windows Installer service disabled?
http://www.symantec.com/docs/TECH92579
Reference for solution:
System Requirements for Symantec Endpoint Protection, Enterprise and Small Business Editions, and Network Access Control 12.1
http://www.symantec.com/docs/TECH163806
- System meets the requirements for Symantec Endpoint Protection 12.1: Remote install

Reference for the included links from the detailed view:
Is the Remote Registry Service enabled?
http://www.symantec.com/docs/TECH201331
Is the Server service started?
http://www.symantec.com/docs/TECH106150
Are the C$, ADMIN$, and IPC$ shares available?
http://www.symantec.com/docs/TECH91905
About the Find Unmanaged Computers function in Symantec Endpoint Protection Manager
http://www.symantec.com/docs/TECH102582
Error: "No Network Provider accepted the given the network path"
http://www.symantec.com/docs/TECH102904
Is the Microsoft Windows Firewall blocking port 445?
http://www.symantec.com/docs/TECH106142
Does the computer need to be restarted?
http://www.symantec.com/docs/TECH92413
Is the local security setting 'Sharing and security model for local accounts' set to Guest Only?
http://www.symantec.com/docs/TECH106144
Is User Account Control enabled on the client?
http://www.symantec.com/docs/TECH9190
Does the Administrator account have a password?
http://www.symantec.com/docs/TECH106143
Is the Windows Installer service disabled?
http://www.symantec.com/docs/TECH92579
Reference for solution:
Best practices for upgrading to Symantec Endpoint Protection 12.1.2
http://www.symantec.com/docs/TECH163700
- SEPM Server examples:

- Symantec Embedded Database service needs attention

Reference for solution:
Is the embedded database service running?
http://www.symantec.com/docs/TECH106152
- The Symantec Endpoint Protection Console is [not] using its configured ports

Reference for solution:
Which Communications Ports does Symantec Endpoint Protection use?
http://www.symantec.com/docs/TECH163787
- System does [not] meet the recommendations for Symantec Endpoint Protection Manager 12.1

Reference for the included links from the detailed view:
Is the local security setting 'Sharing and security model for local accounts' set to Guest Only?
http://www.symantec.com/docs/TECH106144
Does the current user have local administrator rights?
http://www.symantec.com/docs/TECH91646
Is User Account Control enabled on the client?
http://www.symantec.com/docs/TECH91902
Is the Windows Installer service disabled?
http://www.symantec.com/docs/TECH92579
Which communications ports does Symantec Endpoint Protection use?
http://www.symantec.com/business/support/index?page=content&id=TECH163787
Reference for solution:
System Requirements for Symantec Endpoint Protection, Enterprise and Small Business Editions, and Network Access Control 12.1
http://www.symantec.com/docs/TECH163806
- The latest version of Symantec Endpoint Protection Manager is [not] installed

Reference for solution:
Obtaining the latest version of Endpoint Protection or Network Access Control
http://www.symantec.com/docs/TECH103088
Release notes for Symantec Endpoint Protection 12.1.x
http://www.symantec.com/docs/DOC4332
- Symantec Endpoint Protection Manager drivers and services are [not] running

Reference for solution:
Are the Symantec Endpoint Protection drivers loaded and services running?
http://www.symantec.com/docs/TECH92415
- Security advisories for Symantec Endpoint Protection

Reference for solution:
Depending on the advisories found
- The Symantec Endpoint Protection Manager communications tests have all passed

Reference for solution to:
Symantec Endpoint Protection: Troubleshooting Client/Server Connectivity
http://www.symantec.com/business/support/index?page=content&id=TECH105894
- There is no client install package configuration issue detected

3. SPE (SEP Power Eraser) - if the SPE scan was previously run
4. LPA - Load Point Analysis - in case this scan was run previously
5. Information - the information section will present us with the following data:
* General:
a) Summary - general information about the system, we will find here general information about the date and time of log collection, timezon, user and domain, physical memory on the machine, CPU model, IPv4 and IPv6 configuration as well as local drives informations
b) Customer - Customer information as provided when saving the report. This section included the issue description - this is as well provided on the tab for report save
c) Installed Symantec Products
* SEP Client specific information:
a) SEP Client Summary:
- Version of the SEP client
- Type of the SEP Software (Enterprise/Small Business)
- Install date of SEP software
- Servers according to sylink.xml - provides of full listing the SEPM servers available for the SEP client
b) Policy:
- Client Group as per policy
- Location
- Location awareness -> if enabled =1, if disabled =0
- Client Control mode -> Server (1) for Server control mode; Server (0) for Client Control Mode
- Policy Serial Number
c) Communications:
- Last heartbeat
- Heartbeat result
- Connection status to SEPM
- Last attempted connection
- Last successful connection
d) Exceptions -> listing of configured centralized and user exceptions
e) File Versions -> contains information about version of some of the SEP file systems like Symevent, Auto-Protect User Mode Interface or Liveupdate.
f) Definitions -> lists installed definitions with revision date information. Following definitions will be covered:
Virus Definitions 12.1.x -> SRTSP
Proactive Threat Protection -> BASH
Intrusion Prevention -> Internet Security
Insight -> ccSubSDK_SCD
Insight -> IronRevocation
Insight -> IronSettings
Insight -> IronWhitelist
Extended File Attributes -> SymEFA
SRT SP Settings -> SRTSPSettings
g) Features -> listing of installed/enabled features alongside with MSI Feature name and install state:
- example:
Application and Device Control DCMain Installed
Firewall Protection Firewall Installed
Intrusion Protection ITPMain Installed
Network Threat Protection NTPMain Installed
Notes Scanner NotesSnapin Installed
Outlook Scanner OutlookSnapin Installed
Pop3/SMTP Scanner Pop3Smtp NotInstalled
Proactive Theat Protection Truscan PTPMain Installed
Sonar Protection TruScan Installed
Virus and Spyware Protection SAVMain Installed
Download Insight Installed
* SEPM Manager specific information:
a) SEPM Summary will give us information about used SEPM Version.
b) Database configurations - information about the DB type, host and username
c) Ports - list of ports used by SEPM communications, alongside with port current state:
6. Best practices - according to the Best Practices scan type - report splits on following tabs:
- Not recommended -"This tab displays reports that resulted in a Not Recommended status. A Not Recommended indicates that the system's configuration is counter to best practice standards and will likely have consequences that should be considered."
- Not compliant - "This tab displays reports that resulted in a Not Compliant status. A Not Compliant status indicates that the system's configuration is not according to best practice and might potentially have unwanted consequences. This status is less severe than a status of Not Recommended."
- Missing data - "This tab displays reports that could not examine all the data needed in order to yield a report status. If one test failed to access required data this will determine the status of the report as Missing data."
- Compliant - "This tab displays reports that resulted in a status of Compliant. A Compliant status indicates that the system is configured according to best practice standards."
- All - "This tab displays all the reports for a given product regardless of status. If a specific report is known and its results sought after, it may be quicker to find the report under this tab rather than to look under each of the status specific tabs."
Some of the common examples we can find in the best practices section:


V. References:
- Symantec Support Tool:
- About the Load Point Analysis feature in the Symantec Endpoint Protection Support Tool
Article: TECH96291 http://www.symantec.com/docs/TECH96291
- The Symantec Endpoint Protection Support Tool
Article: TECH105414 http://www.symantec.com/docs/TECH105414
- About the Symantec Endpoint Protection Support Tool
Article: TECH91280 http://www.symantec.com/docs/TECH91280
- How to run the Symantec Endpoint Protection Support Tool remotely
Article: HOWTO72599 http://www.symantec.com/docs/HOWTO72599
- SymHelp Tool:
- About Symantec Help (SymHelp)
Article: TECH170735 http://www.symantec.com/docs/TECH170735
- Symantec Help (SymHelp)
Article: TECH170752 http://www.symantec.com/docs/TECH170752
- What command-line parameters are available for use with Symantec Help (SymHelp)?
Article: TECH170732 http://www.symantec.com/docs/TECH170732
- Load Point Analysis and Symantec Power Eraser are not available in SymHelp
Article: TECH201415 http://www.symantec.com/docs/TECH201415
- Unable to launch or view SymHelp
Article: HOWTO75989 http://www.symantec.com/docs/HOWTO75989
↧
↧
Block Software By Fingerprint
How to block applications in SEP using MD5
1. Firstly we need to obtain the file Checksum.exe .
The file is located on the root folder of the SEP client (%programfiles%\Symantec\Symantec Endpoint Protection\Checksum.exe)
2. After we obtained the file and we need to have the program that we want to block installed (or if the program doesn't need installation then we need the executable file).
3. I would suggest copying the Checksum.exe program to c:\ to make the procedure easier.
4. Assuming that the file is in C:\ then what we do is:
· click Start-->Run-->CMD.EXE
· A command line will appear.
· Navigate to the folder where the Checksum file is located.
· Run the following command:
Checksum.exe **result file location** **application location**
**Result file location** = the location and name of the result file
**application location** = the location of the application we want to extract its fingerprint.
For example: Checksum.exe c:\result.txt c:\programfiles\ Symantec\Symantec Endpoint Protection\smcgui.exe
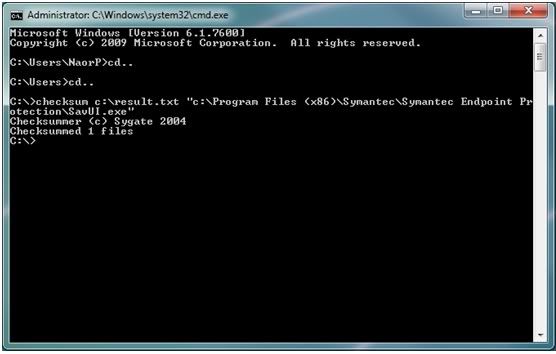
· As you can see I wanted to find out what is the checksum of savui.exe and exported the result file to result.txt
· The procedure should take only a couple of seconds and you should see "Checksummed 1 file".
· When we open the output file this is the answer we will get:
9213d1c5f877272231f6763f143d554c c:\Program Files (x86)\Symantec\Symantec Endpoint Protection\SavUI.exe
· The part with the unique ID is the Fingerprint of the file and we also have the path of the file.
5. Using the Fingerprint extracted with SEP:
· Open the SEPM
· Go to Policies and click on Application and Device control policies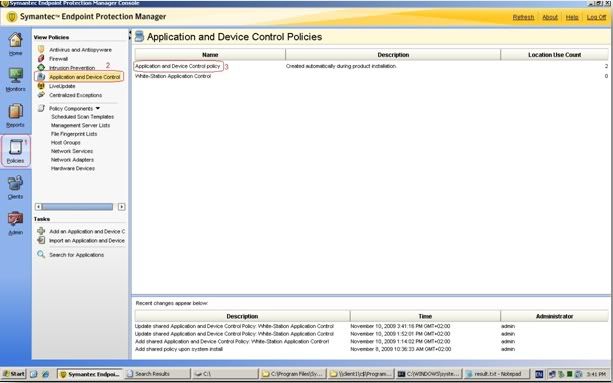
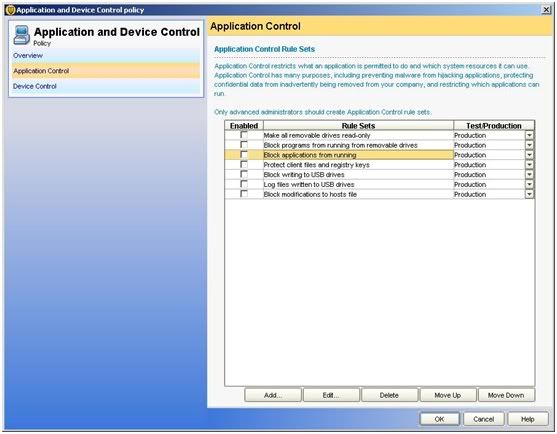
· Right click on the Policy and click edit (I decided to use the default application control policy but you could create your own if you'd like).
· Click on Application control "Block application from running" and "edit"
· Go to "apply this rule to the following processes" and click on "Add"
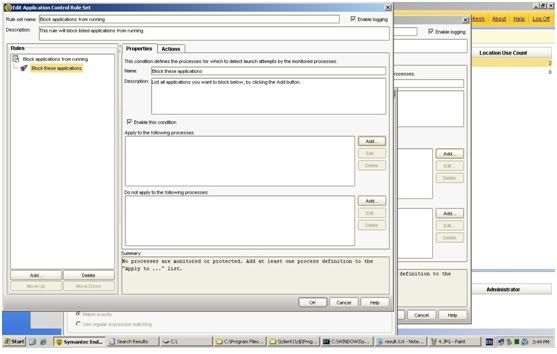

· click on "Options" and then 2 new fields will come out.
· click on Match the fingerprint and there paste the Unique ID we have foung earlier: 9213d1c5f877272231f6763f143d554c
· Click on OK and that is it. SEP will block the program that you want.
· One Reminder: you need to apply the policy on clients and make sure that the Application policy is on production so that it would block the software.
I have also uploaded the file here.
Enjoy,
Naor Penso
Security Engineer
Netcom Malam-Team
↧
The Most Detailed Way To Block UltraSurf
Here is the step by step process to disable Ultra Surf from being accessed by your clients.
To start with, Ultra Surf leaves a finger print that shall be needed by the admin as a constant value. It is very fortunate that the fingerprint is also included when you open the Ultra Surf. Listed below are the different fingerprints for the Ultra Surf variants available in the web namely:
1. UltraSurf 9.4 (.exe)
md5: 11bc744801b516d0b84fba5850ec8789
2. UltraSurf 9.4(.zip)
md5: 8aed5412df0f621e399c78a7f408c6fb
3. UltraSurf 9.2 (.exe)
4b498bcac14da546f420cd08bae1894b
4. UltraSurf 8.9 (.exe)
f556271e1338dfc224cbebf6fe8f8eae
5. UltraSurf 8.8 (.exe)
4e3a66482ef96368251d91b4f5ae0fda
6. Firefox add-on (.zip)
md5: 6ce151b1b0ef8430031a8e9a69f38806
We have to log in as a full administrator to the SEPM console and proceed first to the group that you will initiate the policy to. Under the policies tab, we must go to the “application and device control policy” that is found within the location specific policies.

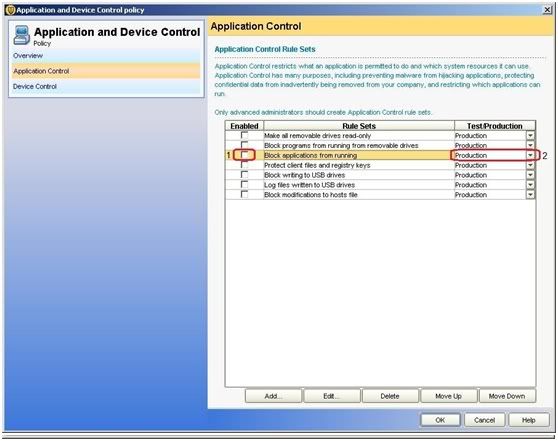
Proceed to the application control and click on block applications from running. We could also put the enabled rule set as production or test only. It is advisable to set it first on test mode first and check later if the process was successful.


Edit the “block applications from running” rule and create a “Lunch process attempts” sub-rule under the “Block applications from running”. Click the add button under the “apply to the following process”. Click options to see the “Match the file fingerprint” and from their put the Ultra Surf MD5 on the space provided and click OK. When you are in front of the “Edit Application Control Set” page, click on the actions tab to choose among the following options that we administrators could use as an action namely:
1. Continue processing other rules
2. Allow access
3. Block access
4. Terminate process

We could also use the send the user a message option so that they would also be aware that they are being monitored thus intimidating them to use or access Ultra Surf in the near future.
Always remember the following after placing new policies in the specified computer groups:
1. Update contents needs to be pushed to the client group
2. We could also pull the update policy from the client
3. Better to reboot the computer for the updates to set
4. Verify if the policy serial number for the group is the same with the computers SEP policy number
5. Test if the policy is now working by checking the log via Truscan Proactive Threat Scan
6. Please note that if you put the enable rule set to test only, Ultra Surf might work but it will be logged via Logs under “Application and Device Control”
7. Enforce also any project to a small group of computers before implementing globally to the whole organization
8. Always do documentations for review
9. Always check for new fingerprints if new UltraSurf versions are available
Lastly, UltaSurf is not a bad application since it is used in the mainland China to have the freedom to be informed specifically about the outside world. It becomes a liability if they are using it to violate company rules that make a breech in the system for viruses to infect the computers they are using as well as others. I hope that this would help other administrators to block UltraSurf from being used.
I would also like to thank mon_raralio and trusted advisor RickJDS for all the valuable help and guidance.
This is just my simple way to repay their goodness by making this article to help others.
Thank you all...
↧
SEPM 11.x to SEPM 12.1 Upgrade process graphical overview with SQL database
This article will demonstrate upgrade process from the SEPM 11 RU7 MP2 to SEPM 12.1 RU4 MP1a version.
Download the latest software from here:https://symantec.flexnetoperations.com/control/symc/registeranonymouslicensetoken . Product Serial Number is required to download the product.
From SEP 12.1 RU1 onwards Symantec is giving an options to download full product in two parts i.e par1 & part 2 or download individual files like SEPM setup, SEP 32 bit setup, SEP 64 bit setup, Tools as per requirement.
It gives more levarage to the Symantec customer to choose what he wants. In many cases it's seen that customer used to required only SEP setup and unnecssarily he had to download entire zip file which is around 1.5 GB in size.
Once the download finishes successfully, extract the contents of the compressed file to a location of your choice
Prior to start upgrade process Stop the 11.x Symantec Endpoint Protection Manager Service. No action required on SQL database.
Navigate to the extracted files, then enter the SEPM folder and double-click on setup.exe:

After Setup.exe is ran, the setup initialization process will start


Ready to Install

Click on Next,

License Agreement Page

The install procedure will prompt for a backup of the existing database so it will be available if required in the future
Enter SQL authentication assigned to default sem5 database.

Click on Install to start Installation


Management Server & Console Installation Summary Page


If the following ports are already in use then other available ports will have to be selected.
Which communications ports does Symantec Endpoint Protection use?
http://www.symantec.com/docs/TECH163787

This settings are not required if SQL is configured with database maintenance activities. If you selected then it may result in conflict situation.

Data Collection Page, Check mark is optional

Click on Next, Server Upgrade Wizard will start the schema upgrade process

This process will display SEPM adding the latest packages.


Upgrade Succeeded message will come up, Click on Next
SEP 12.1 Login Screen - Good to go
Will see new option on SEPM login screen 'Forgot your password'. It's a new & safe way to recover the SEPM login password.
Resetpass.bat file will be no longer be provided by Symantec.

After successful upgrade you must activate the license.
Activating your new or renewed Symantec Endpoint Protection 12.1 product license
http://www.symantec.com/docs/HOWTO55294
↧
↧
How to block clients connection to the specific group
#Updated on 3rd June'14
Hello Everyone,
Today we will see how we can block the clients connection to the specified group which they were assigned in the client installation package.
We can set up client installation packages with their group membership If you define a group in the package, the client automatically is added to the appropriate group. The client is added the first time it makes a connection to the management server.
We can turn on blocking if you do not want clients to be added automatically to a specific group when they connect to the network.
Let's see how to make it turn on.
Select the Specific group or groups, Right click on the group name, Click on Properties

At the bottom of Group Propertis you will see the option 'Block New Clients'. By default it's uncheck.

Even you can check in right pane under 'Details'

The blocking option prevents users from automatically being added to a group.
You can block a new client from being added to the group to which they were assigned in the client installation package. In this case, the client gets added to the default group. You can manually move a computer to any group.
This is helpful if you don't want clients to report to their respective group after connected to the SEPM first time.
Reference: http://www.symantec.com/docs/HOWTO55005
Note: It is never recommended to check the "Block New Clients" option for the Default Group.
↧
Recovering Ransomlocked Files Using Built-In Windows Tools
Introduction
This is the second of an informal series on how to keep your enterprise environment secure using often-overlooked capabilities of Symantec Endpoint Protection (and the OS upon which it functions).
The first article, Using SEPM Alerts and Reports to Combat a Malware Outbreak, demonstrated how to use reporting features of SEP 12.1's SONAR component to identify Suspicious files for which there were no AntiVirus signatures yet created.
This article deals with a few possible ways how to prevent and recover from one of today's most-destructive threats, should it infect your network and hold your data hostage.
About Cryptolocker and Ransomware: An Ounce of Prevention....
Recent years have shown a rise in the number of ransomware threats in circulation. These threats hijack a whole computer or its data and demand that a payment is made in order to unlock or decrypt them. The authors of these malicious threats have a very strong financial motive for infecting as many computers as possible, and have put substantial resources into making these threats prevalent. New variants are seen all the time. The following articles (and the links they contain) have more detail on the subject.
Additional information about Ransomware threats
http://www.symantec.com/docs/TECH211589
Ransomcrypt: A Thriving Menace
https://www-secure.symantec.com/connect/blogs/ransomcrypt-thriving-menace
One recent variation calls itself "CryptoLocker." Current definitions from Symantec detect this family as Trojan.Cryptolocker though older definitions classified it as Trojan.ransomcrypt.f or Trojan.Gpcoder.H. Prevention is far better than a cure for ransomware and ransomlock threats: end user education and the use of some of SEP's optional capabilities can help keep your data safe!
This infection is typically spread through emails sent to corporate email addresses, pretending to be from an array of legitimate companies. These emails would contain an attachment that, when opened, infects the computer. These .zip attachments contain executables that are disguised as PDF files: they have a PDF icon and are typically named something like FORM_101513.pdf.exe. Since Microsoft does not show extensions by default, they look like normal PDF files and trick victims into opening them. If SEP12.1's optional Proactive Threat Protection (SONAR) is running, it will prevent these double executable filenames from causing harm.
| Sometimes Trojan.Cryptolocker is brought into the network from Trojan.Zbot, so full system scans are necessary to identify any and all threats introduced in the environment. Do not rely on SEP's AutoProtect alone! |
Once it is on the computer, Trojan.CryptoLocker will contact a "secret server" (Command and Control server) and generate a unique key with which to encrypt the victim's files. Using SEP's optional IPS components will block this communication and keep files from being locked by this threat. Definitely deploy IPS, if it is not already in use!
If it is able to generate a key, Trojan.CryptoLocker will then begin to sabotage all the MS Office documents. Open Office documents, and other valuable materials it can. A list of affected extentions is available in the Trojan.ransomcrypt.f Technical Details (though, of course, different variants will behave differently....). Both files on the local computer and on any mapped network shares can be affected. Once the encryption is complete, the threat will display a pop-up which explains what it has done and demand payment for those files to be decrypted. It may also change the Windows desktop.

...The Pound of Cure
If your files have been locked by this threat, Symantec advises: do not to pay the ransom. If these scams make money for their authors, it will only encourage the attackers. Your payment will fund R&D for new and more sophisticated attacks against you.
Follow the steps in this document to contain and eliminate the threat:
Best Practices for Troubleshooting Viruses on a Network
Article URL http://www.symantec.com/docs/TECH122466
Now it's time to think about recovery.
Decryption without the key from your attackers is not feasible, but that does not mean that a Trojan.CryptoLocker threat must seriously disrupt your business. A scan with new AntiVirus definitions will be able to detect and remove the executable file and prevent any further damage. If your organization has been following best Disaster Recovery practice and maintaining a routine schedule of backups, then simply delete all the encrypted files and restore them from their last known-good backup. Symantec supplies Backup Exec, NetBackup, and a number of backup tools in the Norton consumer products. Other vendors supply other products which can likewise make the job of recovering from Trojan.CryptoLocker quite straightforward.
With some variants of Trojan.Cryptolocker, it is possible to use Windows Powershell to generate a list of files that have been encrypted by ransomlock. You can dump the list of files in the CryptoLocker registry key using the following command:
(Get-Item HKCU:\Software\CryptoLocker\Files).GetValueNames().Replace("?","\") | Out-File CryptoLockerFiles.txt -Encoding unicode
Note that more recent variants seem to have changed their code to prevent the generation of such a list. It will be necessary to identify the corrupted files manually.
Microsoft Built-In Tools: Windows Backup
Windows comes with a built-in backup and restore utility. Windows Backup is a freebie that can restore encrypted files (or files otherwise damaged by any threat), providing that you have made a backup of them prior to the damage. Microsoft have released a video on how to use the built-in backup and restore tool to backup your important files. Watching this simple how-to will enable you to schedule a known-good backup of your selected data, and will only cost a minute of your life. Definitely recommended!
Back up your files
http://windows.microsoft.com/en-ie/windows7/back-up-your-files
This Windows Backup tool also has the ability to create a system image- this is an exact image of the entire drive: system settings, programs, files, everything. If this system image is restored, it will not only replace all the corrupted files that Trojan.CryptoLocker has damaged- it will overwrite everything! Use system image restoration with caution.
Use a Previous Version
An alternative, if it is a technology in use in your organization, is to restore from a Previous Version. Previous versions are copies of files and folders that Windows automatically saved as part of system protection. This feature is fantastic at rescuing files that were damaged by malware. Here's another Microsoft article with all the details:
Previous versions of files: frequently asked questions
http://windows.microsoft.com/en-ie/windows7/previous-versions-of-files-frequently-asked-questions
If system protection is enabled, Windows automatically creates previous versions of files and folders that have been modified since the last restore point was made.
As an example: let's say that Trojan.CryptoLocker has turned the important MS Word document "Network and Telco.doc" into gibberish. From Windows Explorer, just right-click it, "Restore previous versions" highlight the version from last week (before the damage was done) and click Restore.

One the File Server: Volume Shadow Copies
If Trojan.CryptoLocker has damaged files that reside in a mapped directory on a corporate file server, there's a slightly different method for restoring them. If Volume Shadow Copies are enabled on the server, recovery should be easy. More details and a mention of gourmet snacks can be found in this Technet article:
Rapid Recovery with the Volume Shadow Copy Service
http://technet.microsoft.com/en-ie/magazine/2006.01.rapidrecovery(en-us).aspx
Conclusion
After cleaning up from this Trojan.CryptoLocker threat, it would be a very good idea to run a diagnostic to ensure there are no additional undetected malicious files on the computer(s). The following article provides an illustrated example of how this can be done:
Using Symantec Help (SymHelp) Tool, how do we Collect the Suspicious Files and Submit the same to Symantec Security Response Team
https://www-secure.symantec.com/connect/articles/using-symantec-help-symhelp-tool-how-do-we-collect-suspicious-files-and-submit-same-symante
And it would also be a good time to ensure that the organization's defenses are in good order. There is a great deal of malware in circulation, and it is guaranteed that tomorrow the baddies will come up with new code and techniques. Take precautions now!
Symantec Endpoint Protection – Best Practices
http://www.symantec.com/theme.jsp?themeid=stopping_malware&depthpath=0
Many thanks for reading! Please do leave comments and feedback below.
↧
What Protection Does Symantec DLP Provide? A Note for Beginners
What Protection Does Symantec DLP Provide?
In this article, I would try to provide some basics about DLP. This article is for beginner who wants to understand the following about DLP:
Where does DLP fit?
What does DLP do and what protection it provides?
To start with let’s see endpoint protection. Endpoint protection has antivirus, anti spyware, network threat protection (host based firewall and host based intrusion prevention) and proactive threat protection which protects based on behavior of a program. But, it doesn’t warn or stops user from copying something which is sensitive on CD/DVD or USB drive, say for example, thousands of customer sensitive information being written on USB drive.
Similarly, perimeter security also does not stop a user from sending sensitive information over email or over HTTP/HTTPS or FTP. There is no way endpoint or perimeter or network security identifies that which data is sensitive.
Therefore, DLP technology came into picture where security is built around data itself. So, once DLP is in place, data loss through endpoints (CD/DVD or USB drive or floppy drive), and data loss through network (email, HTTP/HTTPS or FTP or any TCP/IP protocol for that matter) can be prevented. So, we can say DLP fits around data itself.
Sensitive information can be defined by writing ‘rule’ in DLP.
DLP primarily focuses on the following channels for preventing data loss:
1. Endpoints (desktop/laptop)
2. Network (email, HTTP/HTTPS or FTP)—also called as data in motion
3. Data residing at file server, NAS, hard drive of server – also called as Data at rest.
For endpoints there is an agent which is installed on the endpoints. That agent monitors all data going outside that endpoint against the ‘rule’ which is defined centrally. Rule is very critical and important aspect of DLP. Endpoint agent communicates with DLP server located centrally whenever user connects on network. It generates an incident whenever DLP rule is violated. Depending on how DLP is configured, endpoint agent can monitor or even prevent the data copy to external drive. Now question arises here is- desktop admin can always uninstall the DLP endpoint agent once he comes to know about it? Answer is no, uninstalling the DLP endpoint agent requires uninstallation password. Also, we are assuming that user may not have admin rights on his laptop/desktop. There are many advanced control in latest version of DLP (ver 11.x.x) to hide and protect DLP agent on endpoints from damage.
Network DLP requires DLP network component to be present inline (or like a sniffer) with email traffic (corporate email) and/or web traffic (proxy servers)
Data at rest component scans for target mentioned, for any sensitive information. Once found, it can generate incident and/or move the data to safer location and leave a mark there, stating that this data is moved to safer location. It can also provide the contact information of the person, in case user wants to retrieve the data.
In the heart of all three channels resides the ‘rule’. Defining the rule is very critical and should be done very carefully. Defining the rule is a huge subject in itself. Symantec, however, helps with many templates across different kind of industries- viz- Pharma, Banking and finance etc. Organizations mature in years in terms of defining the rule to block the traffic. Rules are required to be fine-tuned over a period of time to reduce false positives.
DLP has the following components:
1. DLP Enforce where policy can be defined and administration can be done. Incidents can also be viewed.
2. Database Server- DLP uses Oracle as database to store incidents and other information.
3. Endpoint Servers- These are used to manage endpoint agents.
4. Network Prevent / Web Prevent Servers for protection with respect to email/web.
5. Discover Server used for identifying sensitive data on various storage like NAS, HDD, file server etc.
I hope this article has at least given the very basic understanding of how DLP works. DLP is very vast solution in itself and can be configured to achieve many objectives. It is a must for organizations who wants to protect their information from leaking/theft. Data loss/theft is mostly done from an insider, knowingly or unknowingly.
↧
Feature comparison between SEP 12.1 SBE and EE
Updated on 27th Dec'12
Hi,
This slide provides a summary of major features and compare the SEP 12.1 Small business Edition and SEP 12.1 Enterprise Edition.
Feature | Small business Edition | Enterprise Edition |
Small to medium businesses with up to 250 clients | Yes | Yes |
Enterprises with more than 250 clients | No | Yes |
Virsus and Spyware protection | Yes | Yes |
Network Threat protection | Yes | Yes |
SONAR proactive threat scans | Yes | Yes |
Application and device control | No | Yes |
Host integrity enforcement | No | Yes |
Single management server and site | Yes | Yes |
Multiple management server and site | No | Yes |
Centrally managed console | Yes | Yes |
Embedded database | Yes | Yes |
Microsoft SQL database | No | Yes |
Central quarantine server | No | Yes |
Content updates from liveupdate | Yes | Yes |
License enforecement | Yes | Yes |
Licnese expired, clients will stop receiving definitions | Yes | No |
Share Insight Cache | No | Yes |
Database Maintenance options (Rebuilt indexes, Truncate transaction logs) | No | Yes |
Risk Tracer option | No | Yes |
User can launch liveupdate manually
| No | Yes |
Supports SPC registration & discovery by default
| No | Yes |
Virtual Image Exception | No | Yes |
Group Update Provider | No | Yes |
Active Directory Synchronization | No | Yes |
Save username and password feature | No | Yes |
Retain logs for more than 60 days
| No | Yes |
↧
↧
What Variables can be used within Response Rules
Whether you setup a response rule for email notification or send a notification to a syslog server, you can set up response action variables to pass incident specific data.
The response action variables are different for Monitor/Prevent incidents than for Discover incidents. The following sections list the variables for each type of incident.
Monitor/Prevent Incidents
$BLOCKED$– Indication of whether or not the message was blocked by the Symantec Data Loss Prevention system (yes or no).
$INCIDENT_ID$– The ID of the incident.
$INCIDENT_SNAPSHOT$– The fully qualified URL to the Incident Snapshot page for the incident.
$MATCH_COUNT$– The incident match count.
$POLICY$– The name of the policy that was violated.
$RECIPIENTS$– A comma-separated list of one or more message recipients.
$RULES$– A comma-separated list of one or more policy rules that were violated.
$SENDER$ - The message sender.
$SEVERITY$ – The severity assigned to incident.
$SUBJECT$ - The subject of the message.
Discover Incidents
$FILE_NAME$– The name of the file in which the incident was found.
$INCIDENT_ID$– The ID of the incident.
$MATCH_COUNT$– The incident match count.
$PARENT_PATH$– The path to the parent directory of the file in which the incident was found.
$PATH$ – The full path to the file in which the incident was found.
$POLICY$– The name of the policy that was violated.
$RULES$– A comma-separated list of one or more policy rules that were violated.
$QUARANTINE_PARENT_PATH$ - The path to the parent directory in which the file was quarantined.
$SCAN$ – The date of the scan that found the incident.
$SEVERITY$– The severity assigned to incident.
$TARGET$ - The name of the target in which the incident was found.
Here is an example of the variables of the Endpoint Prevent indients.
Create a response rule to log to a Syslog Server, on the 'Message' section, input all the variables of the 'Monitor/Prevents Incidents':

When an incident generate, the content of the Syslog like this:

↧
Symantec Endpoint Protection: Custom Scanning by Drive Letter
Overview:
When it comes to creating and configuring administrator-defined scans in the Symantec Endpoint Protection Manager, sometimes there isn't quite enough granularity. For example, let's say that all the clients addressed by your Virus and Spyware Policy group have 3 drives:
- C:\ where your Windows installation resides.
- E:\ an extra storage drive.
- F:\ another extra storage drive.
Let’s also say that you wanted to create an administrator-defined scan which would perform a scan on your C:\ drive once week, your E:\ drive once a month, and your F:\ drive once a day. While it’s possible for each individual client to decide on such custom scans using the client, there isn’t currently a way to create such a policy in the SEP manager using the graphical user interface (GUI). In the SEP manager, you are given only [COMMON_APPDATA], [COMMON_DESKTOPDIRECTORY], [COMMON_PROGRAMS], [COMMON_STARTUP], [PROGRAM_FILES], [PROGRAM_FILES_COMMON], [SYSTEM], and [WINDOWS] as scannable locations.
This customized scanning policy is available for import into your SEP manager. It includes all 26 English letters. You can make customized scans using this prebuilt policy. This policy is not backwards compatible with older versions of Symantec Endpoint Protection.
Currently Supported version:
Symantec Endpoint Protection Manager 12.1.4
Attachments:
Discrete Drives Policy.zip
Instructions:
- Open your SEP Manager and navigate to the Policies tab. Select “Add a Virus and Spyware Protection Policy”.
![1.png]()
- Select the file “Custom Scanning Policy.dat” (included as attachment in this post) and click “Import.”
![2.png]()
- Your custom discrete drive policy is now imported. Double click the policy titled "Discrete Drives Policy" to open the edit window.
![5.png]()
- It is now possible to create Administrator-defined scans based on discrete drive letters to drive letters A:\ - Z:\.


Note: This policy has been tested on SEP version 12.1.4 only. Backwards compatibility is not supported. Please upgrade to the latest version of SEP to use this policy. You can apply this policy to groups. These scans will show up as read-only scans in the client to which they are deployed.
↧
Application Monitoring
Application monitoring lets you monitor third-party applications for IM, email, or HTTP/S clients. By default, Symantec Data Loss Prevention only monitors first-party applications such as AIM, Microsoft Outlook, or Mozilla Firefox. Examples of third-party applications include Skype, Mozilla Thunderbird, or Google Chrome. Any application that is not specifically monitored by Symantec Data Loss Prevention must be added to the Application Monitoring page before Symantec Data Loss Prevention can begin monitoring. For example, if your company uses Mozilla Thunderbird, you must add Mozilla Thunderbird to the Application Monitoring page. You need to add the application because Mozilla Thunderbird is not monitored by default. After Mozilla Thunderbird is added, Symantec Data Loss Prevention monitors the file attachments that are sent by the email client through the network.
Additionally, you can configure global changes to default applications. You can associate blacklist or whitelist metadata to network monitoring, CD/DVD applications, and the applications that use print/fax or Clipboard functions. You can also specify if you do not want Symantec Data Loss Prevention to monitor applications for network, print/fax, Clipboard, or file system activities. For example, you may want to exclude Clipboard activities on Microsoft Outlook. You would edit the settings for Microsoft Outlook to exclude Clipboard activity on the application fingerprinting page. The applications on this page are only the applications that you want to modify for network, print/fax, Clipboard, or file system monitoring.
The Application Monitoring page displays the list of currently monitored CD/DVD applications. If you do not see the specific CD/DVD application you need, you must add that application to the list.
List of CD/DVD applications :
The following table describes the supported CD/DVD burning applications and the supported versions. If you have a different CD/DVD burning software application, you can add your CD/DVD application to the list of recognized burning applications. After you have submitted your CD/DVD application, Symantec Data Loss Prevention incorporates your CD/DVD burning software into its system. To include your CD/DVD burning software, contact Symantec Support. You cannot delete or modify any pre-existing burning applications.
Brand names and binary names of CD/DVD burning software contains a list of the brand names of the third-party CD/DVD burning software as well as the binary name of the specific versions.
Brand name Binary name
Blindwrite BW.exe
Burn At Once mkisofs.exe
BurnAware Free Edition burnaware_data.exe
CheetahBurner CheetahBurner.exe
CopyToDVD c2cman.exe
CopyToDVD copytocd.exe
Cheetah DVD CheetahBurner.exe
Cheetah CD CheetahBurner.exe
CommandBurner CmdBurn.exe
DeepBurner DeepBurner.exe
GEAR for Windows gear.exe
Nero nero.exe
Nero express essentials 7 nero.exe
NeroStartSmart NeroStartSmart.exe
RecordNow RecordNow.exe
Roxio drgtodsc drgtodsc.exe
Roxio Mediahub Mediahub.exe
Roxio5 Creatr50.exe
Roxio9 Creator9.exe
Roxio10 Creator10.exe
Roxio_Central33 Roxio_Central33.exe
Roxio_Central36 Roxio_Central36.exe
SilentNight Microburner microburner.exe
StarBurn StarBurn.exe
Note: When you use a CD/DVD writer, small text files of less than 64 bytes are not detected during a burn to ISO. Text files over 64 bytes in size are detected normally.
Note: You can remove any application that you add, but you cannot remove a pre-populated application.
Additionally, you can add details about the publisher name for the application. The publisher name details the maker of the software. Adding the publisher name lets Symantec Data Loss Prevention verify the application even if the binary name has been changed. Primarily, the publisher name is used for identifying Symantec processes. However, you can add the publisher name for any of your applications. Adding the publisher name is optional.
Below I will explain you how to add an application to monitor. To add an application, please follow the below procedure.....
Adding an application :
The Add Application Monitoring page can be used to add third-party applications to monitoring policies. Third-party applications can include the following types of applications:
CD/DVD applications (for example, Roxio)
Internet browsers (for example, Google Chrome)
IM applications (for example, Skype)
SMTP applications (for example, Mozilla Thunderbird)
Adding an application
Procedure Step 1 : Under the Application Information section, You must enter at least one of the following fields:
@ Name
@ Binary Name
@ Internal Name
@ Original Filename
@ Publisher Name
If you enter the Publisher Name, you can choose to select the Verify publisher name option. This option ensures that the publisher name of the application is correct. Using the Verify publisher name option may affect performance as it increases system resources.
Procedure Step 2 : Under the Application Monitoring Configuration section, select one or more of the following monitoring options:
@ Network Access
@ Print/Fax
@ Send to Clipboard
@ Filesystem Activity
Procedure Step 3 : If you have selected Filesystem Activity, you can select one of the following options:
@ Monitor Application File Access
@ Monitor writing to CD/DVD
Selecting the Application File Access or CD/DVD options lets you choose to monitor the files that the application opens or the files that the application reads.
↧
Symantec Endpoint Protection: Modifying the XML-based Policies for Increased Functionality
Overview:
While you may not realize it, any .dat policy exported from the Symantec Endpoint Protection Manager is simply a compressed XML file. By changing the extension from .dat to .zip, you gain access to the actual input values for the policies. By having direct access to these values, you are provided with a more granular way to control how your policy works.* One such example is creating administrator-defined scans based on drive letter (C:\, D:\, etc).
Exploring the policies in their XML formats can provide a better understanding of the way that policies are constructed on the backend. In this document, I'll walk through the process of creating a custom scanning policy that relies on the drive letter to assign a new scan. This is just one of the many possibilities that editing the XML policies creates.**
Requirements:
Symantec Endpoint Protection 12.1.x***
Symantec Endpoint Protection Manager 12.1.x***
Difficulty Level:
Intermediate-Advanced
Instructions:
- First, we need to export a policy from the Symantec Endpoint Protection Manager (SEPM). Open the SEPM console and click the “Policies” tab.
![1_0.png]()
- Highlight the Virus and Spyware Protection policy.
![2_0.png]()
- Select one of the three default policies. We'll choose Virus and Spyware Protection policy- Balanced. Right click the policy and click Edit.
![3_0.png]()
- Highlight “Administrator-Defined Scans” on the left-hand side.
![4_0.png]()
- For this next step, we will create new “template scans”. These are going to be the values which we will later edit in the XML code itself. This is the most important step for creating new, custom policies. You may add as many as you like. For this example, we’ll just add the first three letters of the alphabet, A:\. B:\. and C:\. Let’s start by adding C:\, where most people choose to install their Windows files.
To begin, click “Add” in the Scheduled Scans section.
![5_0.png]()
- Ensure the “Create a new scheduled scan” radio button is selected, and click Ok.
![6.png]()
- Name the policy “C:\”. (You may name the policy whatever you like, but this will make the XML editing process much easier. For now, let's just use C:\). Enter your description. Select “Custom Scan” from the Scan Type drop down bar.
![7.png]()
- Select Edit Folders.
![8.png]()
- Select the Scan selected folders radio button, and check the COMMON_APPDATA. Click Ok to exit the Edit Folders window.
![9.png]()
- Observe the key change. Previously, the Scan the following folders text area displayed ALL_FOLDERS. Now it displays COMMON_APPDATA.
This is a crucial difference. This box must not read ALL_FOLDERS.![10.png]()
- De-select Memory, Common infection locations, and Well-known virus and security risk locations.
![11.png]()
- Check the “Save a copy as a scheduled Scan Template”, and click Ok to exit the Edit Scheduled Scan window.
![12.png]()
- Your scheduled scan C:\ has been created. Proceed to the next step.
![13.png]()
- At this point, you must decide how many drives you would like to be able to scan discretely. You may use as many as you like, but in this example, we’ll use just three: A:\, B:\, and C:\. This means that we’ll need to add two new scans from template. Click the Add button and select Create a scheduled scan from a Scheduled Scan Template. Check the policy you just created, C:\. Click Ok to exit the window.
![14.png]()
- Complete step 14 n times, where n is the number of drives you wish to be able to scan discretely. For our example, we’ll create our three policies and name them respectively: A:\, B:\, and C:\. (A pre-built policy for SEPM 12.1.4 is available here, with all 26-drive letters accessible). When your scan window matches the image below, you are ready to proceed. Click OK to exit the policy edit window.
![15.png]()
- Ensure that the Balanced policy is highlighted, and select “Export the policy” on the lower left-hand Tasks panel.
![16.png]()
- Select Export.
![17.png]()
- Navigate to the folder where you have exported your policy. Change the file extension from .dat to .zip.
![18.png]()
Note: If you do not see file extensions in the file name, ensure that the option in Windows “Show or hide file name extensions” has been enabled. (Click here for more information on configuring this setting)
- Unzip the folder and extract main.xml. Open this file with a text-editor such as Notepad or Notepad++, but not a word processor like Microsoft Word.
![19.png]()
- Once you have opened the file, quickly find the policies we have created by running a Find command. Let’s run a find command on the on the document to search for the string A:\. This will help us home in on the exact string we're trying to replace.
![20.png]()
- Near the string A:\ which you have located in step 20, there is another string ScanDirectories="[COMMON_APPDATA]" nearby, usually one line down. This is the string that will be modified. Replace COMMON_APPDATA with your drive letter, A:\. Ensure you remove the brackets.
![21.gif]()
- Repeat steps 20 through 21for the remaining number of drives (Run a Find command for B:\ and C:\ and replace them as above).
When you have made all of the string replacements, save your work. Then, exit your text editor and re-compress your main.xml file.![22.png]()
- Rename the file main.zip to New Policy.dat. This file is now ready for import in the SEPM.
![23.png]()
- Open your SEP Manager and navigate to the Policies tab.
![1_0.png]()
- Select Import a Virus and Spyware Protection Policy.
![25.png]()
- Navigate to the directory where New Policy.dat exists. Select the file and click Import.
![26.png]()
- You will receive a prompt alerting you that this policy already exists. Type New Policy in the Specify a different name field. Click Ok to exit the Input window.
![27.png]()
- Right click on your new policy and click Edit, the click Administrator-defined scans in the policy edit window.
![28.png]()
- Right click on A:\ to open the Edit Scheduled Scan window.
![29.png]()
- Observe the change. Where the Scan the following folders text area used to display [COMMON_APPDATA];, it now displays the drive letter A:\;.
![30.jpg]()
- Congratulations! You can now create custom scans based on drive letter. These policies can integrate with your other administrator-defined scan policies as well.


Thank you for reading this article, please leave a comment below on your experience with this process.
*The information in this article is for education purposes only: editing policies in this way may create unexpected behavior in your environment or cause the product to malfunction. XML customized policies may not be compatible between versions of SEP.
**Please be responsible and test your policies thoroughly before deploying them to your production network.
***Policies are not likely compatible between versions (e.g. policies created in 12.1.4 SEPM may not necessarily be deployable to 12.1.3 clients)
↧
↧
The Remote EDM Indexer
The Remote EDM Indexer is a utility that converts a comma-separated value, or tab-delimited, data file to an Exact Data Matching index. The utility is similar to the local EDM Indexer used by the Enforce Server. However, the Remote EDM Indexer is designed for use on a computer that is not part of the Symantec Data Loss Prevention server configuration.
Using the Remote EDM Indexer to index a data source on a remote machine has the following advantages over using the EDM Indexer on the Enforce Server:
It enables the owner of the data, rather than the Symantec Data Loss Prevention administrator, to index the data.
It shifts the system load that is required for indexing onto another computer. The CPU and RAM on the Enforce Server is reserved for other tasks.
The SQL Preindexer is often used with the Remote EDM Indexer. The SQL Preindexer is used to run SQL queries against SQL databases and pass the resulting data to the Remote EDM Indexer.
About the SQL Preindexer
This chapter describes how to use the SQL Preindexer. The SQL Preindexer utility is always used with the Remote EDM Indexer utility. It is installed in the \Vontu\Protect\bin directory during installation of the Remote EDM Indexer. The SQL Preindexer utility generates an index directly from a SQL database. It processes the database query and then pipes it to the Remote EDM Indexer utility.
Read the chapter about the Remote EDM Indexer in this guide before running the SQL Preindexer.
The SQL Preindexer runs from the command line. If you are on Linux, change users to the "protect" user before running the SQL Preindexer. (The installation program creates the "protect" user.) The SQL Preindexer only supports Oracle databases.
An example of a command to run the SQL Preindexer follows. The SQL Preindexer runs a SQL query to capture the name and the salary data from the employee data table in the Oracle database. This example shows how to pipe the output of the SQL query to the Remote EDM Indexer. The Remote EDM Indexer indexes the results using the ExportEDMProfile.edm profile. The generated index files are stored in the EDMIndexDirectory folder.
SqlPreindexer -alias=@//myhost:1521/orcl -username=scott -password=tiger -query="SELECT
name, salary FROM employee" | RemoteEDMIndexer -profile=C:\ExportEDMProfile.edm
-result=C:\EDMIndexDirectory\Because you pipe the output from the SQL Preindexer to the Remote EDM Indexer, review the section about Remote EDM Indexer command functions and options.
Below are the steps to index a data file on a remote machine and then use the index in Symantec Data Loss Prevention.
Please follow the below procedure steps Steps to use the Remote EDM Indexer
Procedure Step 1 : Install the Remote EDM Indexer on a computer that is not part of the Symantec Data Loss Prevention system :
Installing the Remote EDM Indexer :
The Remote EDM Indexer is installed from the same installation program as the other Symantec Data Loss Prevention components. Copy the ProtectInstaller_11.1.exe file to the remote machine where the data that needs to be indexed resides. The Linux version of Symantec Data Loss Prevention has a text-based command console option in the installation program that can be used.
Installing from the command line (for Linux):
The following procedure describes how to install from the command line for Linux.
To install a Remote EDM Indexer
1] Log on as root and copy the ProtectInstaller_11.1.sh file to the /tmp directory on the computer.
2] Change the directory to /tmp by typing:
cd /tmp
3] You may need to change permissions on the file before you can run the file. If so, type:
chmod 775 ProtectInstaller_11.1.sh
4] Once the file permissions have been changed you can run the ProtectInstaller_11.1.sh file, by typing:
./ProtectInstaller_11.1.sh -i console
Once the console mode installation launches, the Introduction step is displayed. For most circumstances, it is recommended to use the defaults during installation whenever possible. Press Enter to proceed to the next step.
5] In the Choose Install Set step, specify the component to install. To install the Remote EDM Indexer, type the number beside the option and press Enter.
6] In the Install Folder step, type the absolute path to the directory where you want to install the files. The default location can be selected by pressing Enter.
7] In the Pre-Installation Summary step, review the installation configuration that you have selected. If you are satisfied with the selections, press Enter to begin the installation. Or, type back and press Enter until you reach the step you want to change.
8] When the installation completes, press Enter to close the installer.
Uninstalling Remote Indexer on a Linux platform :
The files to uninstall the Remote EDM Indexer are located in the root level of the Symantec Data Loss Prevention installation directory. Follow this procedure to uninstall the utility on Linux.
To remove a Remote EDM Indexer from the command line
1] Log on as root and change to the Uninstall directory by typing:
cd /opt/Vontu/Uninstall
2] Run the Uninstall program by typing:
./Uninstall -i console
3] Follow any on-screen instructions.
To install the Remote EDM Indexer on a Windows Platform :
Note: Symantec recommends that you disable any antivirus, pop-up blocker, and registry protection software before beginning the installation process.
To navigate through the installation process:
Click Next to display the next installation screen.
Click Back to return to the previous installation screen.
Click Cancel to terminate the installation process.
To install the Remote EDM Indexer on a Windows Platform
1] Go to the directory where you copied the ProtectInstaller_11.1.exe (Windows) or ProtectInstaller_11.1.sh (Linux) file.
In some circumstances, you may need to change the file permissions to access the file.
2] Run the installation program (either ProtectInstaller_11.1.exe or ProtectInstaller_11.1.sh).
The installer files unpack and the Welcome screen displays.
3] Click Next and then accept the Symantec Software License Agreement to continue.
4] Select Indexer from the list of components that appears and click Next.
5] On the Select Destination Directory screen, click Next to accept the default installation location (recommended). Alternately, click Browse to navigate to a different installation location, and then click Next.
6] For Windows, choose a Start Menu folder and then click Next.
7] The Installing screen appears and displays an installation progress bar. When you are prompted, click Finish to complete the installation.
Uninstalling Remote Indexer on a Windows platform :
The files to uninstall the Remote EDM Indexer are located in the root level of the Symantec Data Loss Prevention installation directory. Follow this procedure to uninstall the utility on Windows.
To uninstall Remote EDM Indexer from a Windows system
1] On the computer where the Indexer is installed, locate and run (double-click) the \Vontu\uninstall.exe program.
The uninstallation program begins and the Uninstall screen is displayed.
2] Click Next. When the uninstallation process is complete, the Uninstall Complete screen is displayed.
3] Click Finish to close the program.
Procedure Step 2 : Create an Exact Data Profile on the Enforce Server to use with the Remote EDM Indexer.
Creating an EDM profile for remote indexing :
The EDM Indexer uses an Exact Data Profile when it runs to ensure that the data is correctly formatted. You must create the Exact Data Profile before you use the Remote EDM Indexer. The profile is a template that describes the columns that are used to organize the data. The profile does not need to contain any data. After creating the profile, copy it to the computer that runs the Remote EDM Indexer.
To create an EDM profile for remote indexing
1] From the Enforce Server administration console, navigate to the Manage > Data Profiles > Exact Data screen.
2] Click Add Exact Data Profile.
3] In the Name field, enter a name for the profile.
4] In the Data Source field, select Use This File Name, and enter the name of the index file to create.
5] In the Number of Columns text box, specify the number of columns in the data source to be indexed.
6] If the first row of the data source contains the column names, select the option Read first row as column names.
7] In the Error Threshold text box, enter the maximum percentage of rows that can contain errors.
If, during indexing of the data source, the number of rows with errors exceeds the percentage that you specify here, the indexing operation fails.
8] In the Column Separator Char field, select the type of character that is used in your data source to separate the columns of data.
9] In the File Encoding field, select the character encoding that is used in your data source.
If Latin characters are used, select the ISO-8859-1 option. For East Asian languages, use either the UTF-8 or UTF-16 options.
10] Click Next to map the column headings from the data source to the profile.
11] In the Field Mappings section, map the Data Source Field to the System Field for each column by selecting the column name from the System Field drop-down list.
The Data Source Field lists the number of columns you specified at the previous screen. The System Field contains a list of standard column headings. If any of the column headings in your data source match the choices available in the System Field list, map each accordingly. Be sure that you match the selection in the System Field column to its corresponding numbered column in the Data Source Field.
For example, for a data source that you have specified in the profile as having three columns, the mapping configuration may be:
Data Source Field System Field
Col 1 First Name
Col 2 Last Name
Col 3 Social Security Number
12] If a Data Source Field does not map to a heading value in the options available from the System Field column, click the Advanced View link.
In the Advanced View the system displays a Custom Name column beside the System Field column.
Enter the correct column name in the text box that corresponds to the appropriate column in the data source.
Optionally, you can specify the data type for the Custom Name you entered by selecting the data type from the Type drop-down list. These data types are system-defined. Click the description link beside the Type name for details on each system-defined data type.
13] If you intend to use the Exact Data Profile to implement a policy template that contains one or more EDM rules, you can validate your profile mappings for the template. To do this, select the template from the Check mappings against policy template drop-down list and click Check now. The system indicates any unmapped fields that the template requires.
14] Do not select any Indexing option available at this screen, since you intend to index remotely.
15] Click Finish to complete the profile creation process.
16] Once you have finished the configuration of the Exact Data Profile, click the download profile link at the Manage > Data Profiles > Exact Data screen.
The system prompts you to save the EDM profile as a file. The file extension is *.edm. Save the file to the remote machine where you intend to run the Remote EDM Indexer utility.
Procedure Step 3 : Copy the Exact Data Profile file to the computer where the Remote EDM Indexer resides ;
Procedure Step 4 : Run the Remote EDM Indexer and create the index files :
Remote EDM Indexer command options:
The Indexer runs from the command line. If you are on Linux, change users to the "protect" user before running the Indexer. (The installation program creates the "protect" user.)
The data, profile, and result options are required with the Remote EDM Indexer. However, if the data option is not specified, the utility reads stdin by default. Often the data is piped from the SQL Preindexer utility.
Option Description
-data Specifies the file with the data to be indexed. If this option is not specified, the utility reads data from stdin.
-encoding Specifies the character encoding of the data to index. The default is ISO-8859-1, but data with non-English characters
use UTF-8 or UTF-16. Optional.
-ignore_date Overrides the expiration date of the Exact Data Profile if the profile has expired. (By default, an Exact Data Profile expires
after 30 days.) Optional.
-profile Specifies the Exact Data Profile to be used. (This profile is the one that is selected by clicking the "download link" on the Exact
Data screen in the Enforce Server management console.) Required.
-result Specifies the directory where the index files are generated. Required.
-verbose Displays a statistical summation of the indexing operation when the index is complete. Optional.
For example, to specify the profile file named ExportEDMProfile.edm and place the generated indexes in the EDMIndexDirectory directory, type:
RemoteEDMIndexer -profile=C:\ExportEDMProfile.edm
-result=C:\EDMIndexDirectory\
When the indexing process completes, the Remote EDM Indexer generates several files in the specified result directory. These files are named after the data file that was indexed, with one file having the .pdx extension and another file with the .rdx extension. Note that indexing a large data file may generate multiple .rdx files with numbered extensions. For example: my_edm.rdx.1, my_edm.rdx.2 and so forth.
Procedure Step 5 : Copy the index files from the remote machine to the Enforce Server.
Copying and using generated index files
After you create the index files on a remote machine, the files must be copied to the Enforce Server and loaded.
To copy and load the files on the Enforce Server
1] Go to the directory where the index files were generated. (This directory is the one specified in the result option.)
2] Copy all of the index files with .pdx and .rdx extensions to the index directory on the Enforce Server. This directory is located at \Vontu\Protect\Index (Windows) or /var/Vontu/index (Linux).
3] From the Enforce Server administration console, navigate to the Manage > Policies > Exact Data screen. This screen lists all the Exact Data Profiles in the system.
4] Click the name of the Exact Data Profile you used with the Remote EDM Indexer.
5] To load the new index files, go to the Data Source section of the Exact Data Profile and select Load Externally Generated Index.
6] In the Indexing section, select Submit Indexing Job on Save.
7] Click Save.
Consider scheduling a job on the remote machine to run the Remote EDM Indexer on a regular basis. The job should also copy the generated files to the index directory on the Enforce Server. You can then schedule loading the updated index files on the Enforce Server from the profile by selecting Load Externally Generated Index and Submit Indexing Job on Schedule and configuring an indexing schedule.
Procedure Step 6 : Load the index files into the Enforce Server :
Copying and using generated index files
After you create the index files on a remote machine, the files must be copied to the Enforce Server and loaded.
To copy and load the files on the Enforce Server
1] Go to the directory where the index files were generated. (This directory is the one specified in the result option.)
2] Copy all of the index files with .pdx and .rdx extensions to the index directory on the Enforce Server. This directory is located at \Vontu\Protect\Index (Windows) or /var/Vontu/index (Linux).
3] From the Enforce Server administration console, navigate to the Manage > Policies > Exact Data screen. This screen lists all the Exact Data Profiles in the system.
4] Click the name of the Exact Data Profile you used with the Remote EDM Indexer.
5] To load the new index files, go to the Data Source section of the Exact Data Profile and select Load Externally Generated Index.
6] In the Indexing section, select Submit Indexing Job on Save.
7] Click Save.
Consider scheduling a job on the remote machine to run the Remote EDM Indexer on a regular basis. The job should also copy the generated files to the index directory on the Enforce Server. You can then schedule loading the updated index files on the Enforce Server from the profile by selecting Load Externally Generated Index and Submit Indexing Job on Schedule and configuring an indexing schedule.
Procedure step 7 : Troubleshoot any problems that occur during the indexing process.
Troubleshooting index jobs
You may encounter errors when you index large amounts of data. Often the set of data contains a data record that is incomplete, inconsistent, or incorrectly formatted. Data rows that contain more columns than expected or incorrect data types often cannot be properly indexed and are unrecognized during indexing. The rows of data with errors cannot be indexed until those errors are corrected and the Remote EDM Indexer rerun. Symantec provides a couple of ways to get information about any errors and the ultimate success of the indexing operation.
The Remote EDM Indexer generally displays a message that indicates whether the indexing operation was successful or not. The result depends on the error threshold that you specify in the profile. Any error percentage under the threshold completes successfully. More detailed information about the indexing operation is available with the verbose option.
Specifying the verbose option when running the Remote EDM Indexer provides a statistical summary of information about the indexing operation after it completes. This information includes the number of errors and where the errors occurred.
See Remote EDM Indexer command options.
To see the actual rows of data that the Remote EDM Indexer failed to index, modify the Indexer.properties file.
To modify the Indexer.properties file
1] Locate the Indexer.properties file at \Program Files\Vontu\Protect\config\Indexer.properties (Windows) or /opt/Vontu/Protect/config/Indexer.properties (Linux).
2] To edit the file, open it in a text editor.
3] Locate the create_error_file property parameter and change the "false" value to "true."
4] Save and close the Indexer.properties file.
The Remote EDM Indexer logs errors in a file with the same name as the indexed data file and with an .err extension. This error file is created in the logs directory.
The rows of data that are listed in the error file are not encrypted. Encrypt the error file to minimize any security risk from data exposure.
↧
Pre-install check list for Symantec Mail Security for Microsoft Exchange
If you want to install Symantec Mail Security for Microsoft Exchange, you need to do and check these before the installation:
- Make sure that the server, or servers, on which you plan to install the software meet the minimum system requirements.
- If you run Symantec Brightmail AntiSpam on the server to which you will install Mail Security, you must remove Symantec Brightmail AntiSpam before you install Mail Security. Symantec recommends that you not run Symantec Brightmail AntiSpam on the same computer as Mail Security.
- If you use the email tools feature of Symantec AntiVirus Corporate Edition, you must remove the email tools before you install Mail Security. The email tools feature of Symantec AntiVirus is incompatible with Mail Security or Microsoft Exchange.
- If you run any antivirus software on the computer to which you will install Mail Security, you must disable it before you install Mail Security. After you install Mail Security and before you enable your antivirus software, configure your antivirus software so that it does not scan the folders that Mail Security uses. Detailed information is in the Symantec Mail Security for Microsoft Exchange Implementation Guide.
- You must have domain administrator privileges to install Mail Security correctly.
- Set your screen resolution to 1024 x 768 or higher. Mail security does not support screen resolutions lower than 1024 x 768.
- Configure the default receive connector for the Exchange Hub Transport server to permit connections from anonymous users.
- Please remove any other email scanning components from other email scanning software as it may cause issues, especially on a clustered resource.
If you use Exchange Server 2007/2010, install the product on all of the following server roles in your organization:
Edge Transport servers (if available):
Spam, File Filtering, and AntiVirus scanning will be available
Hub Transport servers:
Spam, File Filtering, and AntiVirus scanning will be available
Mailbox servers:
File Filtering and AntiVirus scanning will be available
Note:
If you change the role of a server on which you installed Mail Security, you must remove the product and re-install it.
When you intall Mail Security on Hub Transport of Edge Transport servers, it automatically installs custom transport agents.
The Mail Security transport agents consist of an antispam transport agent and an antivirus transport agent.
By default, the Mail Security transport agents are installed with a lower priority than the Exchange transport agents. If you modify your transport agent priorities, make sure that you modify the Mail Security transport agents so that they remain at a lower priority than the Exchange transport agents.
↧
Introduction to the Log Types of Symantec Messaging Gateway
Symantec Messaging Gateway logs let you monitor events for your Scanners, the Control Center, Directory Data Service, and Spam Quarantine.
Be familiar with these log file will be great help to troubleshooting.
Here is the description of the log types that are available for Scanner:
Scanner Log Type | Description |
Conduit | Records the status about downloading antispam rules and uploading statistics. |
Brightmail Client | Records the status about the message filtering. |
Brightmail Engine | Records the status of the Brightmail Engine. |
JLU Controller | Records the status about Java LiveUpdate virus definition downloads. This log is the primary log file that you should use for troubleshooting LiveUpdate issues. |
JLU Client | An auxiliary log file to the JLU Controller log file that records the status about Java LiveUpdate virus definition downloads. Use this log file only when the JLU Controller log file does not contain enough information for troubleshooting an issue. |
MTA | Records the status about sending and receiving email. |
Content Filtering | Records the status about Content Filtering. |
Here is the description of the log types that are available for Control Center log types - Console:
Console Log File | Description |
BrightmailLog.log | Records the status about Control Center interactions. |
Catalina<date>.log Catalina.out | Records the status from the Tomcat Web Server. The Control Center runs inside the Tomcat server. These files contain the messages that are generated from the Tomcat Server and also the applications that run within Tomcat. |
Here is the description of the log types that are available for Control Center log types - Database:
Database Log File | Description |
Error.log Error.log.#.gz | Records any errors that occur while the Control Center accesses the MySQL database. |
Slow-queries.log Slow-queries.log.#.gz | Records the slow MySQL queries. |
Here is the description of the log types that are available for Control Center log types - Events:
Event Log File | Description |
Brightmail_Admin_Events.<yyyy-mm-dd>.log | Records all changes made in the Control Center for the date that is indicated in the log file name. |
Here is the description of the log types that are available for Quanantine log:
Quarantine Log | Description |
Release | Records the To address, From address, and Subject of each message that is released from Spam Quarantine. It also records the user who released each message and a timestamp. |
Here is the description of the log types that are available for Directory Data Service log:
Directory Data Service Log | Description |
Directory Data Service | Records the status about the Directory Data Service. |
↧
Symantec Insider Tip: Successful Submissions!
Introduction
This is the sixth of an informal series on how to keep your enterprise environment secure using often-overlooked capabilities of Symantec Endpoint Protection (and the OS upon which it functions).
- The first article, Using SEPM Alerts and Reports to Combat a Malware Outbreak, demonstrated how to use reporting features of SEP 12.1's SONAR component to identify Suspicious files for which there were no AntiVirus signatures yet created.
- The second, Recovering Ransomlocked Files Using Built-In Windows Tools, deals with a few possible ways how to prevent and recover from one of today's most-destructive threats, should it infect your network and hold your data hostage.
- Third came Two Reasons why IPS is a "Must Have" for your Network, which illustrated how SEP's optional Intrusion Prevention System (IPS) component can help security admins keep their organization secure and track down infected computers on the network
- The Day After: Necessary Steps after a Virus Outbreak is for use after the attacks have ended. This fourth article intends to help admins prevent further attacks and make recovery from any future infection as painless as possible.
- Killing Conficker: How to Eradicate W32.Downadup for Good gives admins the techniques they need to eliminate one of their network's most persistent pests: W32.Downadup, also known as the Conficker worm.
This new "Symantec Insider Tip" article aims to provide advice and examples of how to get your suspicious files to the correct team, in the correct format, with all the correct information necessary for speedy processing.
Symantec's Official Article
By "submission" I mean sending questionable files to Symantec's Security Response department for analysis. Please read the following article for the official word on the submissions process.
How to Use the Web Submission Process to Submit Suspicious Files
Article URL http://www.symantec.com/docs/TECH102419
Tip!
- For files that are suspected of being malicious, your Technical Support Engineer can provide the correct submission URL based on your current contract.
- For files that are you believe to be safe but are being detected, use Symantec's False Positive Submission Site regardless of your contract.
What to Submit
Symantec adds protecion against thousands of new threats every day. Definitions are continuously updated in response to submissions received by customers, so please submit:
- Files that are given bad reputations by the SymHelp Threat Analysis Scan with a recommendation to "submit" or "remove"
- Files that are recommended for submission by Symantec Tech Support, after your SymHelp diagnostics or other logs are examined
- Files which other vendors detect but are not found by Symantec Endpoint Protection or another Symantec security product
- Files which a SEPM's SONAR or IPS reports indicate are responsible for suspicious activity
Malicious files that are engineered to attack Android, Linux, Mac and other non-Windows systems are also submitted through the same web portals. There's no special URL necessary for non-Windows threats.
What Not to Submit
In almost all cases, Security Response needs the undetected malicious executable file which is responsbile for the infection. Submitting any of the following to them will be of little use.
- Text files, .ini files, .xml files and similar
- Files that have been corrupted or locked by a threat like Trojan.Cryptolocker
- Phishing mails (these are not harmful in themselves- if there is a mail with a suspicious attachment, submit that attachment. If the mail has a link to an .exe, download the .exe and submit that)
- Files that have been digitally signed by Microsoft or another major vendor.
- Files that are already detected by SEP or another Symantec security product (.vbn for example)
- Screenshots of the malicious file or the damage it has done
- Output from the SymHelp diagnostic tool (send those .sdbz or .sdbd files to Technical Support, not directly to Security Response!)
- Any materials related to a new or existing Technical Support case
| For safety reasons, anything submitted to Security Response stays in Security Response. Those files cannot be forwarded on to other departments. |
The web portal system will not be able to process:
- Files larger than 20 MB
- Compressed (zipped) files with more than 9 files inside
- Compressed (zipped) files which contain more than 20 MB of content
- Compressed (zipped) files with a password
- Compressed into a format other that ZIP or RAR
Also:
- If you believe that a detection is a False Positive, please only submit it to https://submit.symantec.com/false_positive/. That's the way to make sure they get to the correct team.
How to Submit It
When filling out the form, you will need to provide your name, company name, email address and Support ID number. You can also enter comments into the Additional File Information field.
Tip!
- Please be sure that the email address used for submissions is a Contact Email address associated with your company's account. Otherwise the submission may not be processed as quickly as your contract entitles.
Ensuring Everything is On Track
Immediately after submitting, there will be an acknowledgement screen displayed. A short time later, an email will be dispatched containing the submission's Tracking Number.
[TRACKING]: Symantec Security Response Automation (Tracking #XXXXXXXX)
Use that reference should you need to make contact with any questions. If hours pass without receiving a Tracking Number, please check your junk mail folder or the email processing rules within your company. If there still is no sign of the mail, contact Technical Support to ensure that the submission has in fact been successfully recived and is being queued up for processing. (They can identify the submission using the unique MD5 hash of one of the submitted files or the email address that was specified.)
Submissions may be processed quickly or it may require several days. This all depends on the current amount of activity in the worldwide threat landscape- something beyond Symantec's control.
When analysis is complete, another email will be dispatched which contains an overview of the findings.
[CLOSED]: Symantec Security Response Automation (Tracking #XXXXXXXX)
If that suspicious file has been confirmed to be malicious, this mail will contain information on how to download new Rapid Release definitions so you can apply protection throughout your organization.
The final mail sent will supply details, when available, on what file changes, network activity and other nastiness this particular malicious file does.
Symantec Security Response Scribe Automation (Tracking #XXXXXXXX) [BETA]
What to do while Submissions are being Processed
If you have submitted a file that you believe is malicious, don't just wait for Security Response to produce definitions against it! There are important actions that must be taken in order to prevent that infection from spreading its damage throughout your network. See Step 3. Quarantine the Infected Computers in the following article:
Best Practices for Troubleshooting Viruses on a Network
Article URL http://www.symantec.com/docs/TECH122466
If you can't just pull the network cable on the infected computer, there are many ways SEP's components can lock down the system and the network and help slow the spread of the threat.
It's also a good idea to submit the file to threatexpert.com for a quick, automated analysis of the file. That may alert you to (for example) Internet IP addresses or domains that you should be blocking at the corporate firewall, severing communications to the threat's remote Command & Control servers.
How to submit files to ThreatExpert
Article URL http://www.symantec.com/docs/TECH96745
FAQ for Y-O-U
Q. Can't I just email the malicious file to Symantec?
A. No, the only method of getting suspicious content to Security Response is via the web portal. Sales, Tech Support and other departments within Symantec cannot receive potentially malicious content.
Q. I thought SEP was automatically making a lot of submissions of files in the background- why don't I get Tracking Numbers for those?
A. When configured to do so, SEP will send anonymous data to Security Response. Symantec Response and the Global Intelligence Network use this submitted information to quickly formulate responses to new and developing security threats. The data that you submit improves Symantec's ability to respond to threats and customize protection. (So, please do always allow submissions!)

As the information submitted is done so anonymously, there is no way to trace it back and send out a tracking number. The article below has details:
Enabling or disabling client submissions to Symantec Security Response
Article URL http://www.symantec.com/docs/HOWTO81000
Q. We have found a mountain of malicious files! We've put them all in one giant 500 MB .zip. I can submit that, right?
A. Sorry, no. Think of all the freight deliveries coming into a city. Rather than building a supersized railroad with tracks 100 feet apart and a car big as a cruise ship, all the incoming goods are divided up into a long train of standard-sized freight cars. That's the way the delivery system is designed. The same goes for submissions to Security Response. Each .zip needs to have no more than 9 files within and a decompressed size of 20 MB or else it will go off the tracks.
Q. What if the file I need to submit is larger than 20 MB?
A. Malicious files are generally (but not always!) smaller than that. For large files, check with Tech Support. They can supply instructions on how to proceed.
Q. In my spare time I am building a comprehensive collection of every executable that has ever existed. Wow, there's a heaping cartload, and I'm only up to 1996! Just in case one of them may have been malicious, I'll submit these beauties all at once to Security Response to see if there has ever been a variant of virus, worm, or whatsit that your engineers have never seen.
A. Thanks, but no. Please only submit files that are suspected of being malware involved in a current outbreak on your own network. Our resources are committed to helping combat today's real-world security threats.
Q. I write code for a software company. Is there any way to submit my latest build to Symantec, ahead of its public release, to make sure my customers won't experience False Positives on this new (and initially unknown) version?
A. Yes! This article has all the details:
Software developer would like to add his/her software to the Symantec White-List.
Article URL http://www.symantec.com/docs/TECH132220
Conclusion
If in doubt about whether or not to submit a particular file, please do ask! Tech Support has trained experts who can examine a diagnostic and swiftly spot the suspicious materials within. They can also provide best practice and recommendations that can help keep your network, data and users safe.
Many thanks for reading! Please do leave comments and feedback below.
↧
↧
Whitepaper-Virtual Desktop Infrastructure for Citrix SEP
Hello Everyone,
This whitepaper focuses strictly on providing guidance on how to successfully deploy the Symantec Endpoint Protection 12.1 protection stack components to a Citrix VDI Environment. This whitepaper does not cover deploying Symantec Endpoint Protection 12.1 workstations in a non-VDI environment or other more general administration concerns or Citrix server best practices in general; for guidance on these topics, please refer to the relevant product documentation. Note also, to date the content of this document has been validated with the US English versions of Citrix XenServer 5.6, XenDesktop 5.6 and Provisioning Services 6.0 as well as Symantec Endpoint Protection 12.1 RU1 running on Microsoft Windows Server 2008. Symantec Endpoint Protection can function seamlessly in a Citrix VDI environment. Simple policy and configuration changes can increase performance and reliability in that environment.
Supporting Links and Other Useful Online Resources:
Best Practices for Symantec Endpoint Protection on Citrix and Terminal Servers
http://www.symantec.com/docs/TECH91070
Symantec Endpoint Protection 12.1 - Virtualization Best Practices
http://www.symantec.com/docs/TECH173650
Citrix Provisioning Services Antivirus Best Practices
http://support.citrix.com/article/CTX124185
How to prepare SEP clients on virtual disks for use with Citrix Provisioning Server
http://www.symantec.com/docs/TECH123419
↧
SEPM 11.x to SEPM 12.1 Upgrade process graphical overview with SQL database
This article will demonstrate the upgrade process from the SEPM 11 RU7 MP2 to SEPM 12.1 RU4 MP1a version.
Download the latest software from here:https://symantec.flexnetoperations.com/control/symc/registeranonymouslicensetoken . Product Serial Number is required to download the product.
From SEP 12.1 RU1 onwards Symantec is giving an option to download the full product in two parts (i.e part 1 & part 2) or download the individual files like SEPM setup, SEP 32 bit setup, SEP 64 bit setup, tools as per the requirement.
It gives more levarage to the Symantec customer to choose what he wants. In many cases it's seen that customer used to required only SEP setup and unnecssarily he had to download entire zip file which is around 1.5 GB in size.
Once the download finishes successfully, extract the contents of the compressed file to a location of your choice
Prior to start upgrade process Stop the 11.x Symantec Endpoint Protection Manager Service. No action required on SQL database.
Navigate to the extracted files, then enter the SEPM folder and double-click on setup.exe:
After Setup.exe is ran, the setup initialization process will start
Ready to Install
Click on Next,
License Agreement Page
The install procedure will prompt for a backup of the existing database so it will be available if required in the future
Enter SQL authentication assigned to default sem5 database.
Click on Install to start Installation
Management Server & Console Installation Summary Page
If the following ports are already in use then other available ports will have to be selected.
Which communications ports does Symantec Endpoint Protection use?
http://www.symantec.com/docs/TECH163787
This settings are not required if SQL is configured with database maintenance activities. If you selected then it may result in conflict situation.
Data Collection Page, Check mark is optional
Click on Next, Server Upgrade Wizard will start the schema upgrade process
This process will display SEPM adding the latest packages.
Upgrade Succeeded message will come up, Click on Next
SEP 12.1 Login Screen - Good to go
Will see new option on SEPM login screen 'Forgot your password'. It's a new & safe way to recover the SEPM login password.
Resetpass.bat file will be no longer be provided by Symantec.
After successful upgrade you must activate the license.
Activating your new or renewed Symantec Endpoint Protection 12.1 product license
http://www.symantec.com/docs/HOWTO55294
↧
The sslkeytool utility and server certificates
Symantec Data Loss Prevention uses Secure Socket Layer/Transport Layer Security (SSL/TLS) to encrypt all data that is transmitted between servers. Symantec Data Loss Prevention also uses the SSL/TLS protocol for mutual authentication between servers. Servers implement authentication by the mandatory use of client and server-side certificates. By default, connections between servers use a single, self-signed certificate that is embedded securely inside the Symantec Data Loss Prevention software. All Symantec Data Loss Prevention installations at all customer sites use this same certificate.
Symantec recommends that you replace the default certificate with unique, self-signed certificates for your organization's installation. You store a certificate on the Enforce Server, and on each detection server that communicates with the Enforce Server. These certificates are generated with the sslkeytool utility.
Note: If you install a Network Prevent detection server in a hosted environment, you must generate unique certificates for your Symantec Data Loss Prevention servers. You cannot use the built-in certificate to communicate with a hosted Network Prevent server.
Note: Symantec recommends that you create dedicated certificates for communication with your Symantec Data Loss Prevention servers. When you configure the Enforce Server to use a generated certificate, all detection servers in your installation must also use generated certificates. You cannot use the built-in certificate with some detection servers and the built-in certificate with other servers.
About sslkeytool command line options :
sslkeytool is a command-line utility that generates a unique pair of SSL certificates (keystore files). sslkeytool is located in the \SymantecDLP\Protect\bin directory (Windows) or /opt/SymantecDLP/Protect/bin directory (Linux). It must run under the Symantec Data Loss Prevention operating system user account which, by default, is "protect." Also, you must run sslkeytool directly on the Enforce server computer.
The following command forms and options are available for sslkeytool:
-genkey [-dir=directory -alias=aliasFile]
Generates two unique certificates (keystore files) by default: one for the Enforce Server and one for other detection servers. The optional -dir argument specifies the directory where the keystore files are placed. The optional -alias argument generates additional keystore files for each alias specified in the aliasFile. You can use the alias file to generate unique certificates for each detection server in your system (rather than using a same certificate on each detection server). Use this command form the first time you generate unique certificates for your Symantec Data Loss Prevention installation.
-list=file
Lists the content of the specified keystore file.
-alias=aliasFile -enforce=enforceKeystoreFile [-dir=directory]
Generates multiple certificate files for detection servers using the aliases you define in aliasFile. You must specify an existing Enforce Server keystore file to use when generating the new detection server keystore files. The optional -dir argument specifies the directory where the keystore files are placed. If you specify the -dir argument, you must also place the Enforce Server keystore file in the specified directory. Use this command form to add new detection server certificates to an existing Symantec Data Loss Prevention installation.
For example, the command sslkeytool -genkey generates two files:
enforce.timestamp.sslKeyStore
monitor.timestamp.sslKeyStore
Unless you specified a different directory with the -dir argument, these two keystore files are created in the bin directory where the sslkeytool utility resides.
Using sslkeytool to generate new Enforce and detection server certificates :
After installing Symantec Data Loss Prevention, use the -genkey argument with sslkeytool to generate new certificates for the Enforce Server and detection servers. Symantec recommends that you replace the default certificate used to secure communication between servers with unique, self-signed certificates. The -genkey argument automatically generates two certificate files. You store one certificate on the Enforce Server, and the second certificate on each detection server. The optional -alias command lets you generate a unique certificate file for each detection server in your system. To use the -alias you must first create an alias file that lists the name of each alias create.
To generate unique certificates for Symantec Data Loss Prevention servers :
1] Log on to the Enforce Server computer using the "protect" user account you created during Symantec Data Loss Prevention installation.
2] From a command window, go to the c:\SymantecDLP\Protect\bin directory where the sslkeytool utility is stored.
3] If you want to create a dedicated certificate file for each detection server, first create a text file to list the alias names you want to create. Place each alias on a separate line. For example:
net_monitor01
protect01
endpoint01
smtp_prevent01
web_prevent01
classification01Note:
The -genkey argument automatically creates certificates for the "enforce" and "monitor" aliases. Do not add these aliases to your custom alias file.
4] Run the sslkeytool utility with the -genkey argument and optional -dir argument to specify the output directory. If you created a custom alias file, also specify the optional -alias argument, as in this example:
This generates new certificates (keystore files) in the specified directory. Two files are automatically generated with the -genkey argument:
enforce.timestamp.sslKeyStore
monitor.timestamp.sslKeyStore
sslkeytool also generates individual files for any aliases that are defined in the alias file. For example:
net_monitor01.timestamp.sslKeyStore
protect01.timestamp.sslKeyStore
endpoint01.timestamp.sslKeyStore
smtp_prevent01.timestamp.sslKeyStore
web_prevent01.timestamp.sslKeyStore
classification01.timestamp.sslKeyStore
5] Copy the certificate file whose name begins with enforce to the c:\SymantecDLP\Protect\keystore directory on the Enforce Server.
6] If you want to use the same certificate file with all detection servers, copy the certificate file whose name begins with monitor to the c:\SymantecDLP\Protect\keystore directory of each detection server in your system.
If you generated a unique certificate file for each detection server in your system, copy the appropriate certificate file to the keystore directory on each detection server computer.
7] Delete or secure any additional copies of the certificate files to prevent unauthorized access to the generated keys.
8] Restart the Vontu Monitor Controller service on the Enforce Server and the Vontu Monitor service on the detection servers.
When you install a Symantec Data Loss Prevention server, the installation program creates a default keystore in the keystore directory. When you copy a generated certificate file into this directory, the generated file overrides the default certificate. If you later remove the certificate file from the keystore directory, Symantec Data Loss Prevention reverts to the default keystore file embedded within the application. This behavior ensures that data traffic is always protected. Note, however, that you cannot use the built-in certificate with certain servers and a generated certificate with other servers. All servers in the Symantec Data Loss Prevention system must use either the built-in certificate or a custom certificate.
Note: If more than one keystore file is placed in the keystore directory, the server does not start.
Using sslkeytool to add new detection server certificates :
Use sslkeytool with the -alias argument to generate new certificate files for an existing Symantec Data Loss Prevention deployment. When you use this command form, you must provide the current Enforce Server keystore file, so that sslkeytool can embed the Enforce Server certificate in the new detection server certificate files that you generate.
To generate new detection server certificates :
1]Log on to the Enforce Server computer using the "protect" user account that you created during Symantec Data Loss Prevention installation.
2] From a command window, go to the c:\SymantecDLP\Protect\bin directory where the sslkeytool utility is stored.
3] Create a directory in which you will store the new detection server certificate files. For example:
mkdir new_certificates
4] Copy the Enforce Server certificate file to the new directory. For example:
5] Create a text file that lists the new server alias names that you want to create. Place each alias on a separate line. For example:
endpoint02
smtp_prevent02
6] Run the sslkeytool utility with the -alias argument and -dir argument to specify the output directory. Also specify the name of the Enforce Server certificate file that you copied into the certificate directory. For example:
This generates a new certificate file for each alias, and stores the new files in the specified directory. Each certificate file also includes the Enforce Server certificate from the Enforce keystore that you specify.
7] Copy each new certificate file to the c:\SymantecDLP\Protect\keystore directory on the appropriate detection server computer.
8] Delete or secure any additional copies of the certificate files to prevent unauthorized access to the generated keys.
9] Restart the Vontu Monitor service on each detection server to use the new certificate file.
↧